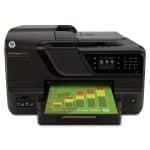
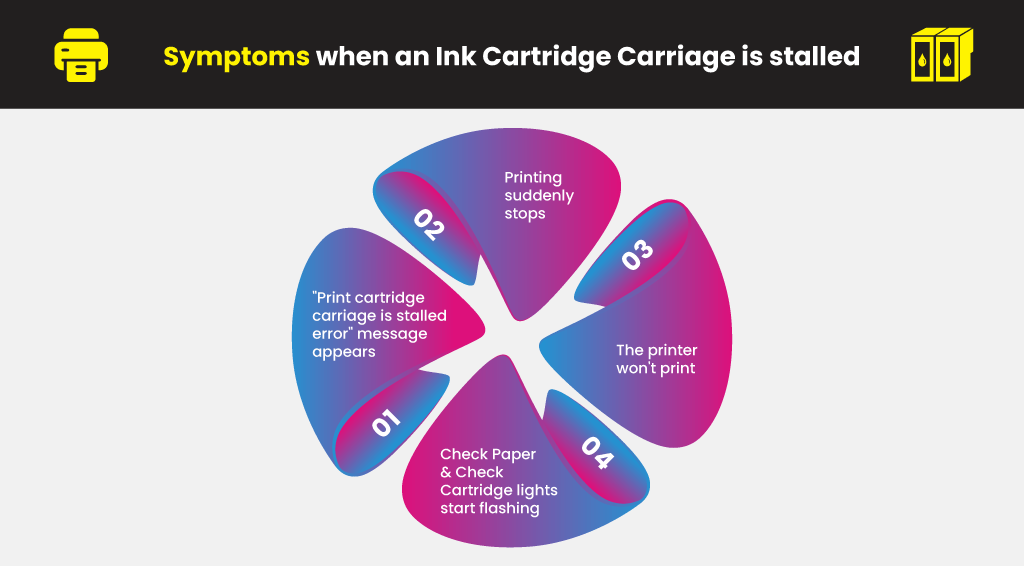
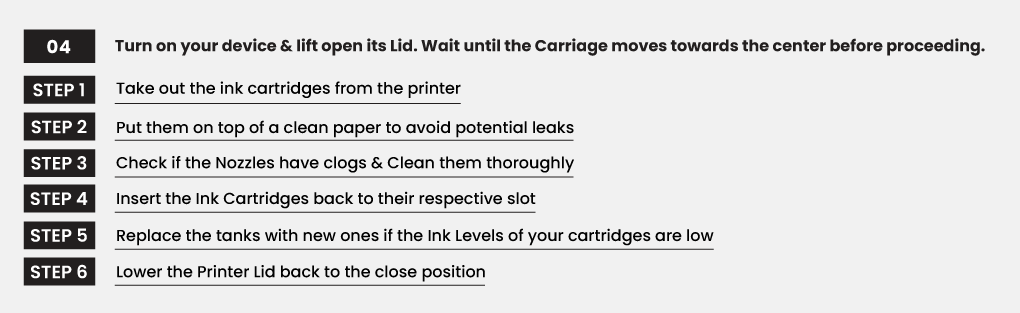
How to fix a stuck HP Printer Ink Cartridge

There’s an infamous issue with HP ink printers that many users frequently encounter throughout the life of their device. If you have been lucky enough to evade this problem until now, it’s not a cause for relief. Because regardless if you print regularly or seldom, you’ll most likely experience a stalled printer cartridge cradle sooner or later.

There are numerous possible reasons as to why an HP printer cartridge gets stuck on the right side. Below is a compilation of all the common causes and best solutions to resolve this notorious HP issue. The troubleshooting methods are proven effective on the HP Officejet Pro 8600 ink and HP Photosmart 5520 cartridges. However, they also work on other models that have LED control panels.

HP OfficeJet Pro 8600
HP 950XL 951XL
HP PhotoSmart 5520
HP 564XL

When an Ink Cartridge Carriage is stalled

The carriage of your HP printer is an assembly that supports its ink cartridges. It moves to and fro in its path, transferring ink into the paper you’re printing. Some of the symptoms that can tell if you have an ink cartridge stall on your HP printer include:

Symptoms-when-an-Ink-Cartridge-Carriage-is-stalled
  • “The print cartridge carriage is stalled error” message appears.
  • Printing suddenly stops
  • The printer won’t print
  • Check Paper and Check Cartridge lights start flashing

Once this happens, the printer may produce a grinding noise as it tries to move the carriage. But because the actuator arm is jamming, this stops the carriage from moving entirely.


Learn More:

Why the Printer Cartridge won't Move

A paper jam is usually the reason why an HP printer cartridge gets stuck on the right side. Pushing the paper excessively into the printer, on the other hand, is the most common cause of a paper jam. You should only push the paper until the first resistance. If you continue to shove it in, it will drive the sheet into the rollers. Once this happens, the printer takes in multiple pages resulting in jams.

Improperly replacing or installing HP Ink Cartridges can trigger the printer to show a carriage stall error status as well. That’s why it’s crucial to install the printer cartridges carefully in the right way.

How to Fix an HP Printer Cartridge Cradle that's stuck

Once the carriage is stuck, your HP printer won’t be able to continue printing unless something is done to deal with the issue. Below are some practical solutions that you can try to resolve the problem quickly and easily:

1.

Reset the HP printer to erase any error status with its print process.

How-to-Fix-an-HP-Printer-Cartridge-Cradle-thats-stuck-01
  1. Detach the Power cord from the back of your Canon printer while the device is still on.
  2. Unplug the Power cord from the electrical outlet
  3. Allow the printer to cool down for at least 15 seconds.
  4. Reconnect the Power cord back into the electrical outlet and then turn on the printer. Let the device warm-up. Please wait for it to stop making noises before you proceed.
  5. Pull out the Paper Tray and load it with clean, white paper. See if the paper feeds smoothly.
  6. Realign the paper correctly and adjust the Input Tray accordingly.

Conduct a test print to see if the printer prints flawlessly. If it doesn’t, then continue with the next solution.

2.

Check if the Paper Tray isn't warped and if it's appropriately settled once you close it.

  1. Please turn off your device and unplug its Power cord.
  2. Take out any paper from its Paper Tray and then detach the tray from the device.
  3. Make sure the Paper Tray is warped by putting a ruler or something straight beside the edge of the rear. If there’s a gap over 1 mm wide between the ruler and tray, the tray is warped.
  4. Once you find that the Paper Tray isn’t warped, proceed to the next step. If it is, however, you’ll need to replace the tray with a new one.
  5. Return the Paper Tray to its original position.
  6. Rotate the printer onto its side to gain access to its underside. Be sure to hold the Scanner Lid safely in place with your hands while rotating the device.
  7. Please make sure that the Paper Tray’s plastic tab is fixed securely on the retainer slot. Try opening and closing the tray a few times until the tab gets into the slot if needed.
  8. Turn the printer back to its original position. Plugin its Power cord and then press the Power button to turn on the device.

Conduct a test print. If the problem is still there, proceed to the next solution.

3.

Search for and take out any paper or material fragment that's blocking the Ink Cartridge Carriage's movement.

  1. Please turn on your Canon printer and open its Ink Cartridge Access Door. Wait until the Carriage stops and become silent before you proceed. Unplug the Power cord from the back of the device while it’s still on, as a safety precaution.
  2. Carefully take out any sheet of paper that’s stuck inside using both your hands. Inspect from top to bottom for paper shreds that might be holding back the Carriage. If there are paper fragments that linger inside the printer, you can expect further jams to happen.
  3. Insert your hand into the Ink Cartridge Access Area and then move the Carriage manually.
  4. Move the Carriage to the left side if it’s stuck on the right, and vice versa. Also, move the Carriage to the right if it’s held in the center.
  5. Get rid of all other bits of pieces and foreign material you find inside the printer. Try and check if the Carriage can move fully through its path by softly pushing it from side to side.
  6. Close the Cartridge Access Door, plug back the Power cord, and then turn on the device.

Conduct a test print. If the problem persists, move on to the next solution.

4.

Please turn on your device and lift open its Lid. Wait until the Carriage moves towards the center before you proceed.

  1. Take out the ink cartridges from the printer. Put them on top of a clean paper to avoid potential leaks.
  2. Check if the Nozzles have clogs and clean them thoroughly using a clean, lint-free cloth damped in warm water.
  3. If the Ink Levels of your cartridges are low, you may have to replace the tanks with new ones.
  4. Insert the Ink Cartridges back to their respective slot and lower the Printer Lid back to the close position.

Conduct a test print. If the problem is still around, it’s time to contact a professional technician. Check if your printer’s warranty is still valid and contact HP support for any assistance that they can give you.

Like & follow our social media pages to see more updates and promotions !

20 Comments

  • Jacki

    The cartridges are all the way to the right and will not move to where I can take them out or check them. There is no papers jam, no little pieces. I cannot access some screws to take cover off of ink area, because lid is in the way.
    Any suggestions?

    Reply
    • Julia Page

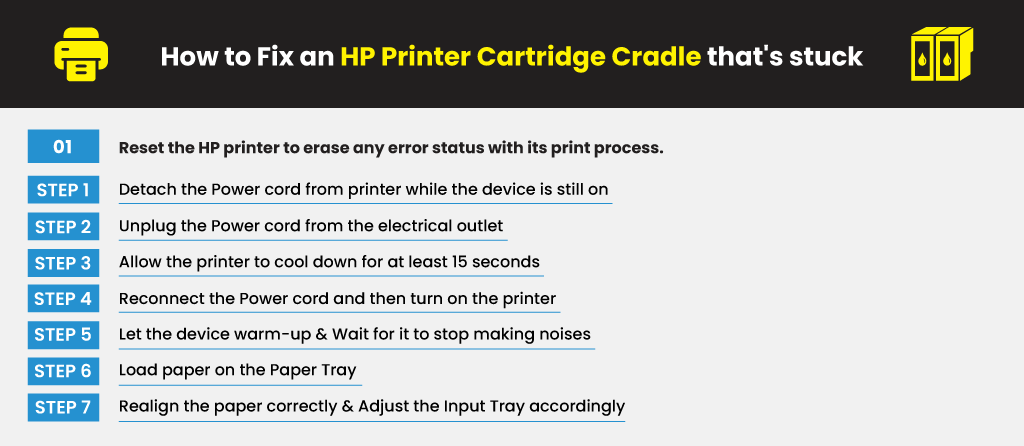
      Hello Jacki! Please try to perform a power reset by turning the printer off. Unplug it and try to leave it in an off state for a few minutes. Then, after a few minutes, plug it again, turn it on and see if it will work. I hope this helps!

      Reply
      • Sue

        My ink cartridge latch wasn’t pulled down before I closed the door. Now the ink cartridge is stuck on the right and won’t move. Any advice?,

        Reply
        • Julia Page

          Hello Sue! Have you tried turning your printer off, then open the lid and turn the printer on? If the cartridge moves, unplug the printer and try to move the cartridge manually to the left and back into the middle if you can. Finally, turn the printer on and see if it works. If it still doesn’t work, kindly reach out to your printer’s customer care for further assistance.

          Reply
  • Etan

    The cartridges are all the way to the right and will not move to where I can take them out or check them. There is no papers jam, no little pieces. I cannot access some screws to take cover off of ink area, because lid is in the way. I followed all your suggestions to no avail. Cartridge carrier will not move to the left

    Reply
    • Julia Page

      Hello Etan! How about a power reset by turning the printer off? Unplug it and try to leave it in an off state for a few minutes. Then, after a few minutes, plug it again, turn it on and see if it will work. I hope this helps!

      Reply
  • Becky

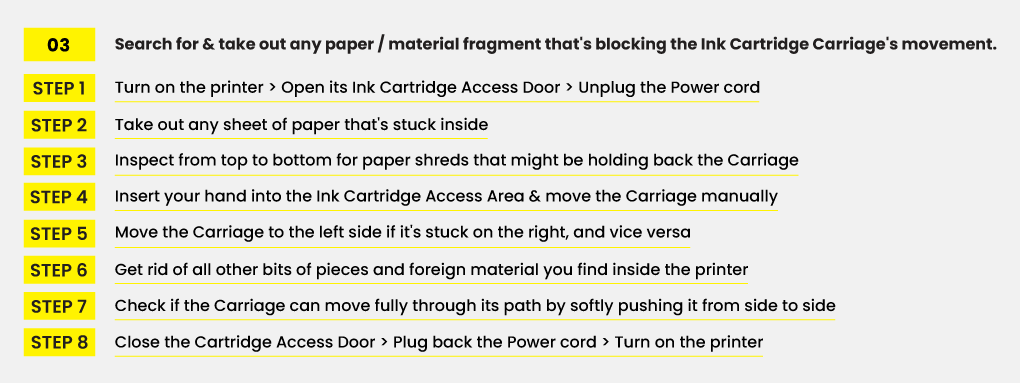
    I had this same problem and was ready to tear the printer apart to access the cartridges. Luckily, before I did too much damage I saw there was a small access to the cartridges directly above them in the printer “frame”. I was able to stick a small flat head screwdriver in the access and slowly push the cartridges to the left.

    Reply
  • Nishant

    That was something, I was desperately looking for, thankfully I found this at the right time.

    Reply
  • rajesh

    hello
    the cartridges are on the left and i cannot move it to the middle or right. please suggest

    Reply
    • Julia Page

      Hello! With the printer turned on, disconnect the power cord from the rear of the printer and also unplug the power cord from the wall outlet. Remove USB cable, if present. Wait for 2-3 minutes, press and hold the power button on your printer for about 30 seconds to remove any additional charge.

      Reply

Leave a Reply

Your email address will not be published. Required fields are marked *

YoYoInk