Your Complete Canon MX922 Printer How to Guide & Support

Canon PIXMA MX-922
Canon PGI-250XL & CLI-251XL

How to Install Canon Pixma MX922 Printer Ink Cartridges

When purchasing a brand new Canon MX922 printer, your package will include a free set of ink cartridges. You can use these cartridges for this installation guide. If you don’t have any at the moment, you can easily order them online from a trusted source. Just make sure to order the correct ink cartridges for your Canon MX922 printer

How-to-Install-Canon-Pixma-MX922-Printer-Ink-Cartridges
  1. Please turn on your Canon MX922 printer. Gently open the Paper Output Tray, followed by the Document Cover.
  2. Open the printer’s Ink Cover and see if the Print Head Holder moves to the cartridge access area. Once you leave the Ink Cover for more than 10 minutes, the Print Head Holder will move towards the right. If this happens, lower the Ink Cover and open it again. Please avoid touching the Print Head Holder and all the metallic parts inside the printer.
  3. Prepare a New Ink Cartridge and unpack it from its plastic packaging. Load the New Ink Cartridge into the slot with its front end facing the printer at a slightly slanting angle. 
  4. Gently press down on the Ink Cartridge until it clicks firmly into place. The Ink Lamp will light red to confirm a successful installation.
  5. Repeat the same steps for each of the other Ink Cartridge Colors.
  6. Close the Ink Cover, followed by the Document Cover.

How to Check the Ink Levels on a Canon MX922

Follow the steps below to check the ink levels of your Canon MX922 printer from a Windows PC or Mac Computer. There’s also a manual check option if you want to do it directly from your printer.

How-to-Check-the-Ink-Levels-on-a-Canon-MX922-Printer

Check from Windows OS 

  1. Open your Windows computer and click on the Start button or Search Bar at the bottom left of the screen. Type in “Devices and Printers” on the search box and windows will instantly display matching results of your query.
  2. Click on Devices and Printers from the search results. Locate your Canon MX922 printer product and right-click on its icon. Select Printing Preferences as your option.
  3. Run the Canon IJ Status on your Windows PC and then click on View Printer Status. Select Ink Details as your option. 
  4. Your PC will now display the Ink Levels on your screen. A notification icon will appear above the image on the Ink Details dialogue box regarding any issue with a Cartridge. 

Check from Mac OS 

  1. Start your Mac computer and click on the Apple logo on the left side of the Mac Dock. Go to System Preferences and select Printers and Scanners.
  2. Click on your Canon MX922 printer from the left pane. Select Supply Levels, and your computer will display Ink Levels on your screen.

Check via Manual Setup Process

  1. Turn on your Canon MX922 printer and then open its Top Cover. 
  2. Wait for the Cartridges to move towards the proper access position.
  3. Open the Cartridge Case and then remove it from the printer.
  4. The Majority of Ink Cartridges feature a transparent plastic construction, which means you can see right through their ink levels.

How to Replace Canon MX922 Printer Ink Cartridges

How-to-Replace-Canon-MX922-Printer-Ink-Cartridges
  1. Plug-in your Canon MX922 printer to a power supply via its Power cord and then press the Power button to turn on the device.
  2. Gently lift open the printer’s Top Cover, followed by the Ink Cartridge Cover. This action will set off the Print Head to the proper cartridge replacement position.
  3. Take out the Empty Ink Cartridge, whose Light Indicator is flashing fast. Push the tab at the front of the Cartridge to release it and then lift the ink tank out from its slot.
  4. Prepare the New Cartridge and take it out from its packaging. Remove the plastic sheet and Orange cap.
  5. Install the New Cartridge. Slide in the front end of the Cartridge into the Print Head at a slanting position. Push the Ink Cartridge down until it locks into place. See to it that the Ink Lamp lights red to confirm successful installation.
  6. Repeat the same steps for each of the other Color cartridges.
  7. Gently close the Ink Cover, followed by the Top Cover, and wait for your printer to initialize.

How to Reset Ink Levels on Canon MX922

  1. Please turn off your Canon MX922 printer and unplug its Power cord.
  2. Press the Power button while plugging the Power cord back into the device. The printer will start resetting into its original Factory Default Settings. 
  3. Press the Right Arrow button repeatedly until a “Shipping Mode 3” message appears on the Display Screen.
  4. Tap the OK button, and a “Without Cleaning” message will appear on the LCD panel. 
  5. Open the printer’s Top Cover, and the Cartridges will start moving towards the left side of the device. Wait for them to stop before you continue.
  6. Please turn off your Canon MX922 printer and unplug its Power cord. Remove the Ink Cartridges and then close the cover.
  7. Plug back the Power cord and then press the Power button to turn on the printer. Wait for 2 – 3 minutes for the Canon MX922 printer to finish recognizing every Ink Cartridge.

How to Remove the Printhead on a Canon MX922 Pixma Printer

How-to-Remove-Printhead-on-Canon-MX922-Pixma-Printer
  1. Turn on your Canon Pixma MX922 printer. Pull out the Paper Output Tray with both your hands holding its sides.
  2. Lift open the Document Cover. Make sure to avoid touching the Printer Input Buttons.
  3. Open the Ink Cover, and the Print Head will move towards the proper removal position. Wait for the Print Head to stop moving before you proceed. Never hold the Print Head or attempt to stop it by hand.
  4. Remove an Ink Cartridge by pushing its front tab and then lifting the Cartridge out from the holder. Take out all the other Ink Cartridges from the Canon MX922 printer using the same procedure.
  5. Long-press the Stop button, and the Carriage will start moving towards the proper replacement position. Release the Stop button once the Carriage stops moving.
  6. Open the Inner Cover and move it towards the bottom.
  7. Pull out the Carriage Tray from the device. Grab the top of the Print Head’s Center Tab with your fingertips and then take out the Print Head.

How to Install the Print Head on a Canon MX922 Pixma Printer

How-to-Install-Print-Head-on-Canon-MX922-Pixma-Printer
  1. Prepare the Replacement Print Head. If you’re planning to install a New Print Head on your Canon MX922 printer, kindly remove it from its packaging. 
  2. Hold the Replacement Print Head’s Center Tab, with its front side facing down. You should be able to see the Green Circuit Board in this position. 
  3. Install the Replacement Print Head into the Print Head Holder. The two tabs on its front bottom corners must insert into the rails on the sides of the holder.
  4. After installing the Print Head into the holder, push the Head Set Lever towards the back of the printer. Close the Inner Cover and load the Ink Cartridges into their respective slots.
  5. Close the Ink Cover, followed by the Document Cover. Sometimes the Print Head will move back to the home position before installation. If this happens, close the Inner Cover, followed by the Operation Panel, then complete the on-screen instructions on the LCD.
Like & follow our social media pages to see more updates and promotions !

2 Comments

  • Mark Henderson

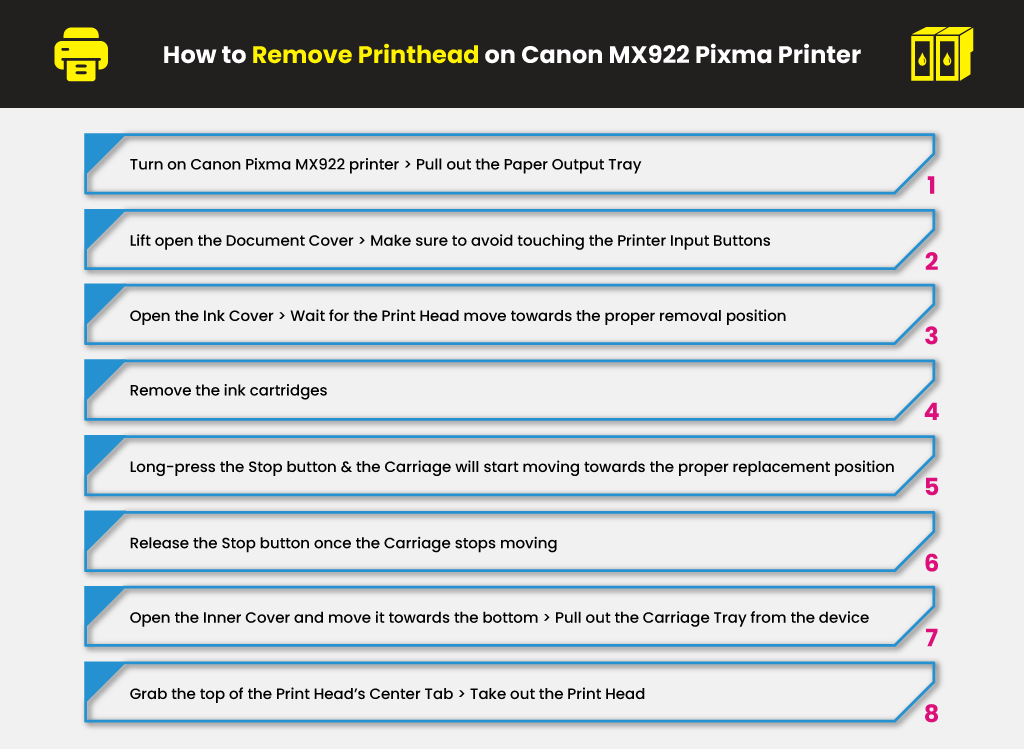
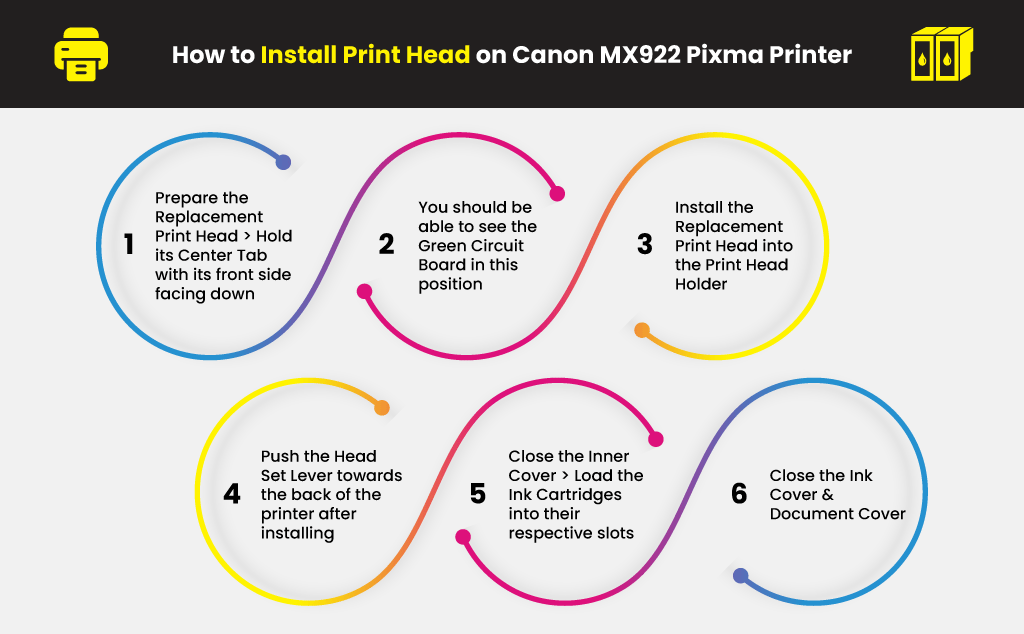
    I just replaced the print head on my MX922. The Cyan and Magenta colors aren’t printing. What should I do to correct this?

    Reply
    • Julia Page

      Hello Mark! First, perform a cleaning cycle. There is a possibility that the nozzles are clogged and need some cleaning. This may require you to perform several times for it to work. However, if the error persists, I have read a hack that worked for some when one of the ink cartridges does not print. Take a little rubbing alcohol and apply it to a Q-tip and run it around the front and back of the cartridge, especially into the ink hole. Do the same where the cartridge gets seated. Finally, do a test print and see if it works.

      Reply

Leave a Reply

Your email address will not be published. Required fields are marked *

YoYoInk