Canon Pixma MG3620 Troubleshooting for Wireless Connectivity Problem
Updated on
The Canon Pixma MG3620 is extremely popular around the world, not only because of its reasonable, $50 pricing. The wireless all-in-one inkjet printer also makes printing incredibly convenient and straightforward for almost any need.
You can print from virtually anywhere around the house or office, thanks to its advanced wireless capability. It also has numerous superb features that help enhance printing efficiency, like Auto Duplex Printing and Mobile Device Printing.
Using premium-quality Canon MG3620 ink cartridges, it delivers superb quality prints for standout documents and stunning photos page after page. But just like any other device, it also has its fair share of errors that can frustrate users.
From paper jams to unresponsive drivers, there are several common issues that you may encounter when using a Canon MG3620. Print results can also be unsatisfactory at times, and this may be due to incorrect ink cartridge installation. If this happens, you may need to reinstall either one or both Black and Tri-color ink cartridges. Click here to learn how to troubleshoot an ink cartridge.
Based on consumer reports, however, issues in Wi-Fi connectivity is the most recurring problem with this Canon printer. It usually occurs when your printer connects to a Wi-Fi network with a new SSID.
If you encounter this issue, end every printer function immediately or wait for it to stop working altogether. In case the wireless indicator is blinking, tap the Stop button. Next, try following any of the set of steps below depending on your computer’s Operating System:
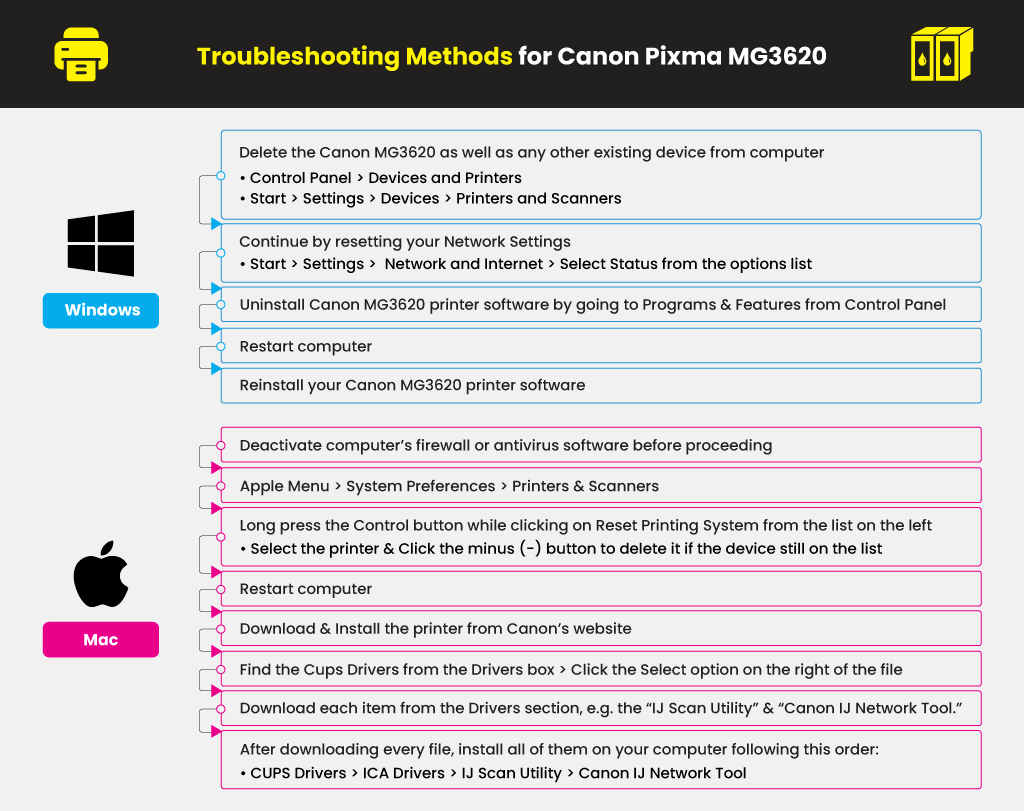
Canon MG3620 Troubleshooting for Windows
1. Delete the Canon MG3620, as well as any other existing device, from your computer. There are two ways you can go about this:
From your PC, go to the Control Panel and then select Devices and Printers, or…
Click on the Start Button and then Settings. Under Settings, click on Devices and then select Printers and Scanners from the option list.
Continue by resetting yourNetwork Settings. Click on the Start Button and then go to Settings. Click on Network andInternet and then select Status from the options list.
Uninstall the Canon MG3620 printer software by going to Programs and Features from the Control Panel.
Restart your computer.
Reinstall your Canon MG3620 printer software. Follow the steps from the product manual on how to install your multifunction to your network.
Canon MG3620 Troubleshooting for Mac
Deactivate your computer’s firewall or antivirus software before you proceed. It will stop your system from blocking the printer’s drivers during installation.
From your computer, go to Apple Menu and then click on System Preferences. Under System Preferences, select Printers & Scanners as your option.
Long press the Control button while you click on Reset Printing System from the list on the left. If your device is still on the list, select the printer and click the minus (-) button to delete it.
Restart your computer.
Download and Install the printer from Canon’s website. Be sure to choose the correct OS for your computer.
Find the Cups Drivers from the Drivers box then click the Select option on the right of the file. Download all the necessary files.
Download each item from the Drivers section, such as the “IJ Scan Utility” and “Canon IJ Network Tool.”
After downloading every file, install all of them on your computer following this order:
CUPS Drivers
ICA Drivers
IJ Scan Utility
Canon IJ Network Tool
After installing all the files, restart your computer and then reactivate your firewall and antivirus software.
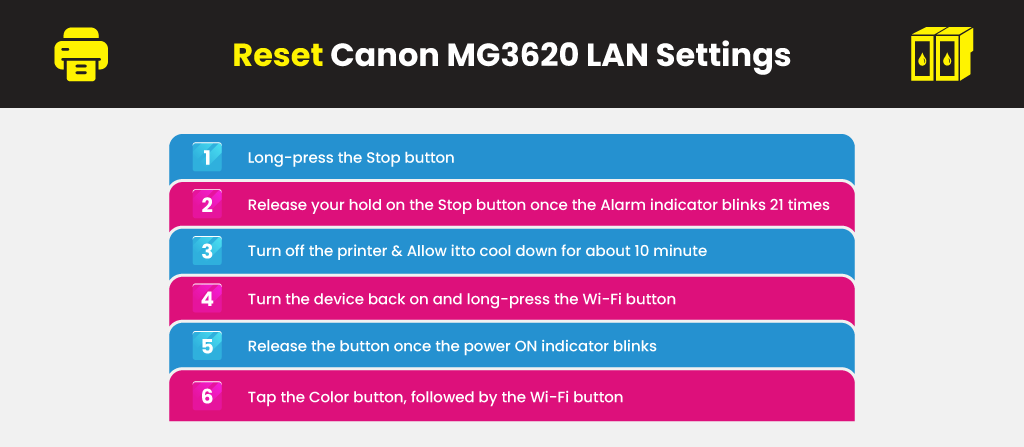
Reset Canon MG3620 LAN Settings
If the Canon MG3620 troubleshooting method above fails, try resetting your printer’s LAN settings. Make sure that there is no other device connecting to your printer before you start. After resetting the LAN settings, you need to uninstall and reinstall the Canon MG3620 software. The same goes for every other wireless device.
Long-press the Stop button.
Once the Alarm indicator blinks 21 times, release your hold on the Stop button.
Please turn off the Canon MG3620 and detach its power cord. Allow the printer to cool down for about 10 minutes.
Turn the device back on and long-press the Wi-Fi button. Release the button once the power ON indicator blinks.
Tap the Color button, followed by the Wi-Fi button. The printer will now start activating the wireless setting.
Try performing a test print to see if your Canon MG3620 is in proper sync wirelessly with your computer. This action will confirm whether or not the wireless setup is a complete success. Click here for a step-by-step guide regarding the process and how it works. If the printer still won’t connect to your Wi-Fi network, contact customer support and request for assistance.
Like & follow our social media pages to see more updates and promotions !
16 Comments
Dinah Austin
My new Canon 3620 cannot find my network – and now I have deleted the existing driversm rebotted, and reinstlled the drivers. But still the MAC says I have no printer?
Hello Dinah! You can try the following steps below:
1. Go to Apple Menu >> System Preferences >> Printers & Scanners
2. Press and hold the Control key as you click the list on the left the click Reset Printing System. If the printer is still listed, select the printer and click the minus (-) button to remove it.
3. Restart your Mac
4. Reinstall the drivers for the printer from Canon website. Make sure you select the correct operating system.
5. Locate the Cups Drivers under the Drivers box then click Select button to the right of the file name. Download the file(s).
6. Select and download all other items under the Drivers section including the “IJ Scan Utility” and “Canon IJ Network Tool”.
7. Once all the files have been downloaded, install each file to your Mac in order:
– CUPS Drivers
– ICA Drivers
– IJ Scan Utility
8. Canon IJ Network Tool
9. After overall installation, restart your Mac.
The message I keep getting says error f8857 print service not enabled. I don’t know what that means…or it will say out of paper when the paper tray is full.
This is an indication that the paper does not feed properly. Here are some tips on how to prevent this from happening:
1. Make sure that the paper is loaded properly. You can try to flip through the paper before loading. The stack of paper needs to be just enough because loading at a maximum capacity may not possible for some printers.
2. The paper should always be in portrait orientation regardless of the printing orientation.
3. Make sure that the leading edge of the paper touches the far end of the front tray.
4. Always check if the paper you are printing on is not too thick or curled.
5. Confirm that the media type and the paper size settings correspond with the loaded paper.
6. If multiple sheets of plain paper are fed from the machine, select the setting for preventing double-feed of plain paper using the operation panel or your computer.
7. Lastly, see to it to clean the paper feed roller.
Firstly, just check and ensure that you proceed to press the setup tab.
Head to the wireless LAN network and select ok.
Choose the easy setup process.
Choose the access point.
Select the available WI-FI network and enter the password.
Insert Set up disk in the desktop.
Select the easy install option and then install it.
On the new page select printer on the available network.
Select next to start the installation process.
Once done just make sure to check the correct functionalities after getting an installation success.
Once done, then you should try to print the desired print files.
We use cookies to ensure that we give you the best experience on our website. If you continue to use this site we will assume that you are happy with it. Ok


 Live Chat


Dinah Austin
My new Canon 3620 cannot find my network – and now I have deleted the existing driversm rebotted, and reinstlled the drivers. But still the MAC says I have no printer?
Julia Page
Hello Dinah! You can try the following steps below:
1. Go to Apple Menu >> System Preferences >> Printers & Scanners
2. Press and hold the Control key as you click the list on the left the click Reset Printing System. If the printer is still listed, select the printer and click the minus (-) button to remove it.
3. Restart your Mac
4. Reinstall the drivers for the printer from Canon website. Make sure you select the correct operating system.
5. Locate the Cups Drivers under the Drivers box then click Select button to the right of the file name. Download the file(s).
6. Select and download all other items under the Drivers section including the “IJ Scan Utility” and “Canon IJ Network Tool”.
7. Once all the files have been downloaded, install each file to your Mac in order:
– CUPS Drivers
– ICA Drivers
– IJ Scan Utility
8. Canon IJ Network Tool
9. After overall installation, restart your Mac.
Heidi A Bayless
The message I keep getting says error f8857 print service not enabled. I don’t know what that means…or it will say out of paper when the paper tray is full.
Julia Page
This is an indication that the paper does not feed properly. Here are some tips on how to prevent this from happening:
1. Make sure that the paper is loaded properly. You can try to flip through the paper before loading. The stack of paper needs to be just enough because loading at a maximum capacity may not possible for some printers.
2. The paper should always be in portrait orientation regardless of the printing orientation.
3. Make sure that the leading edge of the paper touches the far end of the front tray.
4. Always check if the paper you are printing on is not too thick or curled.
5. Confirm that the media type and the paper size settings correspond with the loaded paper.
6. If multiple sheets of plain paper are fed from the machine, select the setting for preventing double-feed of plain paper using the operation panel or your computer.
7. Lastly, see to it to clean the paper feed roller.
Alhdemar Parta Correa
Hello, my new printer canon 3620, is don’t printing, I don’t know why, it’s say error, check printer for error. Please help.
Julia Page
Firstly, just check and ensure that you proceed to press the setup tab.
Head to the wireless LAN network and select ok.
Choose the easy setup process.
Choose the access point.
Select the available WI-FI network and enter the password.
Insert Set up disk in the desktop.
Select the easy install option and then install it.
On the new page select printer on the available network.
Select next to start the installation process.
Once done just make sure to check the correct functionalities after getting an installation success.
Once done, then you should try to print the desired print files.