Once your inkjet printer starts producing bad prints or blank pages, the incident can be pretty frustrating. So what should we do when we encounter this kind of problem? For many of us, the typical answer would be to replace the printer ink cartridges with new ones. We’d ignore the fact that the cartridges still have ink and that the real problem is a clogged printer head.
9 times out of 10, the culprit behind white lines is a printer head nozzle that’s clogged with dried ink. But we’d probably overlook this strong possibility since we are clueless on how to clean printer heads at the start. Moreover, replacing ink cartridges seems like a more straightforward course of action.
But if you’re knowledgeable in cleaning printer heads, it would be easier for you to deal with the problem. And by dealing with a blocked printer head, you’ll save yourself plenty of money now and in the future. Let’s examine carefully what it’s all about and how you can go about it properly.
All inkjet printers in the market, fromEpson toCanon, and other popular brands, share one common feature: printer heads. Regardless of the size and model, every inkjet printer has a print head that deposits ink on numerous media forms. Today, the print head contains a chamber system that feeds ink and a small nozzle that sprays it out.
But before the advent of printer heads, creating printouts involved printing presses that make direct contact with the media. It was an especially messy and costly procedure, and the printing press machines were enormous and hefty.
Today’s printer heads, however, don’t touch the media printout, resulting in a cleaner and more economical work. It sprays ink into the media with incredible precision to deliver the best possible print results.
Epson T288 XL
Canon PG-240 XXL & CL-241 XL
Clean Printheads automatically
When it comes to inkjet printers, you can unclog the print head using the printer’s automatic cleaning cycle. You can activate this cycle from your printer’s control panel or at the Printer Properties from your computer’s Control Panel.
The process prompts your printer to discharge excess ink out, softening and removing clogs on the print head. Select the deep cleaning function option if the simple cleaning doesn’t work in unclogging the print head.
If the automatic cleaning method fails, you can also opt for a manual cleaning approach. Keep in mind that there are two kinds of print heads. There’s a print head that’s integrated from the cartridge, and there’s also a detachable type. Below, we’ll discuss the proper cleaning method for each one.
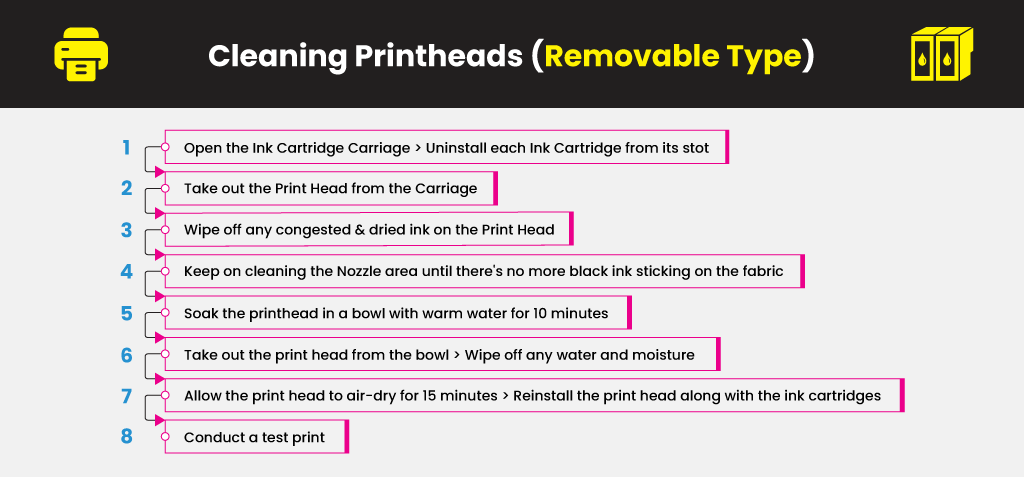
Cleaning Printheads (Removable Type)
Avoid exposing and cleaning the sponge area of the ink cartridges when cleaning detachable print heads. To prevent any direct contact of ink on your skin, use protective gloves throughout the process. Follow these steps to clean a removable printhead manually:
Open the Ink Cartridge Carriage and uninstall each Ink Cartridge from its stot.
Carefully take out the Print Head from the Carriage.
Wipe off any congested and dried ink on the Print Head using a clean, lint-free cloth damped in warm water.
Keep on cleaning the Nozzle area until there’s no more black ink sticking on the fabric.
Soak the printhead in a bowl with warm water for 10 minutes. Do not use boiled water. Put a clean paper towel at the base and place the print head above it while it soaks.
Take out the print head from the bowl, and wipe off any water and moisture using a dry lint-free cloth.
Place the printhead on top of a paper towel and allow it to air-dry for 15 minutes. Once it’s fully dry, reinstall the print head along with the ink cartridges.
Conduct a test print to see if printing quality is back to normal. Make sure to do a Nozzle check first to confirm if the print head is clean before you start printing.
If the problem persists, repeat the same steps. This time, however, let the print head to soak for 2 – 3 hours or overnight, if necessary.
Cleaning Printheads (Non-Removable Type)
If you’re using a printer that doesn’t have a detachable print head, however, the cleaning method is different. It will require you to open your device and access its interior, just like when you’re replacing ink cartridges.
Make sure to unplug the power cord for easier access to the print head while cleaning. Soak a folded blotting paper on a cleaning solution and then rest the print head carriage on top of it. It will help clean out its exterior surface.
Try running the carriage to and fro above the blotting paper to clean the exterior surface further. Finally, put about 2 – 3 ml of cleaning solution into every blocked nozzle and let it soak for 1 hour.
Replace the ink cartridges if needed, then conduct a printhead clean and see if there are positive changes. If there aren’t, try repeating the same steps but allow the cleaning solution to soak longer or overnight, if necessary.
In case there’s clogging in a particular color, try setting the printer into maximum resolution. Then print a whole page using only that ink color. It’s mostly the same procedure your printer utilizes once it performs an individual nozzle clean.
Types of Printhead Cleaning Solutions
You will find all sorts of cleaning solutions on the market today, and each type differs vastly from the next. Many are entirely detergent-based, and they work well onprinters that use generic ink since every generic ink is water-based. When it comes to dealing with genuine ink clogs, however, you’ll need a higher grade cleaning solution.
15 Comments
Dianne
I put new ink cartridge in printer and keep getting message it is not recognizing ink cartridge
Hello Dianne! Have you tried performing a cleaning cycle? I would suggest cleaning your printer heads and nozzles. These might be clogged and a possible reason why it doesn’t recognize the ink cartridges; If your printer is working well and has no issues, the ink cartridges might be defective. You might want to check that out too.
we have a brand new ET 2720 printer, we installed it, it worked perfectly. We went on vacation and now it prints, the sounds indicate printing, but nothing is printed. The print test page has very light blue Windows Test Page only printed on it. There are white lines in the letters.
When the printer sounds like it is printing, but nothing prints, you can try running the Head Cleaning Utility.
By doing so, you are accessing the printer utilities such as the Epson Status Monitor, Nozzle Check, Head Cleaning, Printer Head Alignment, and Printer & Options Information. These options may help in resolving the issue. Just click the Utility tab in the printer software window, then, click the button of the utility you want to use.
We use cookies to ensure that we give you the best experience on our website. If you continue to use this site we will assume that you are happy with it. Ok


 Live Chat


Dianne
I put new ink cartridge in printer and keep getting message it is not recognizing ink cartridge
Julia Page
Hello Dianne! Have you tried performing a cleaning cycle? I would suggest cleaning your printer heads and nozzles. These might be clogged and a possible reason why it doesn’t recognize the ink cartridges; If your printer is working well and has no issues, the ink cartridges might be defective. You might want to check that out too.
David Bennett
What does the print head look like. Any picture?
Julia Page
Hello David! May I know for what printer brand and model?
Cynthia Jaworsky
we have a brand new ET 2720 printer, we installed it, it worked perfectly. We went on vacation and now it prints, the sounds indicate printing, but nothing is printed. The print test page has very light blue Windows Test Page only printed on it. There are white lines in the letters.
Julia Page
When the printer sounds like it is printing, but nothing prints, you can try running the Head Cleaning Utility.
By doing so, you are accessing the printer utilities such as the Epson Status Monitor, Nozzle Check, Head Cleaning, Printer Head Alignment, and Printer & Options Information. These options may help in resolving the issue. Just click the Utility tab in the printer software window, then, click the button of the utility you want to use.